Showing posts with label how. Show all posts
Showing posts with label how. Show all posts
Wednesday, March 18, 2015
How to Make a Telescope at Home
With a telescope like the one here described, made with his own hands, a farmer boy many years ago discovered a comet which had escaped the watchful eyes of many astronomers.
First, get two pieces of plate glass, 6 in. square and 1 in. thick, and break the corners off to make them round, grinding the rough edges on a grindstone.
Use a barrel to work on, and fasten one glass on the top of it in the center by driving three small nails at the sides to hold it in place. Fasten, with pitch, a round 4-in. block of wood in the center on one side of the other glass to serve as a handle.
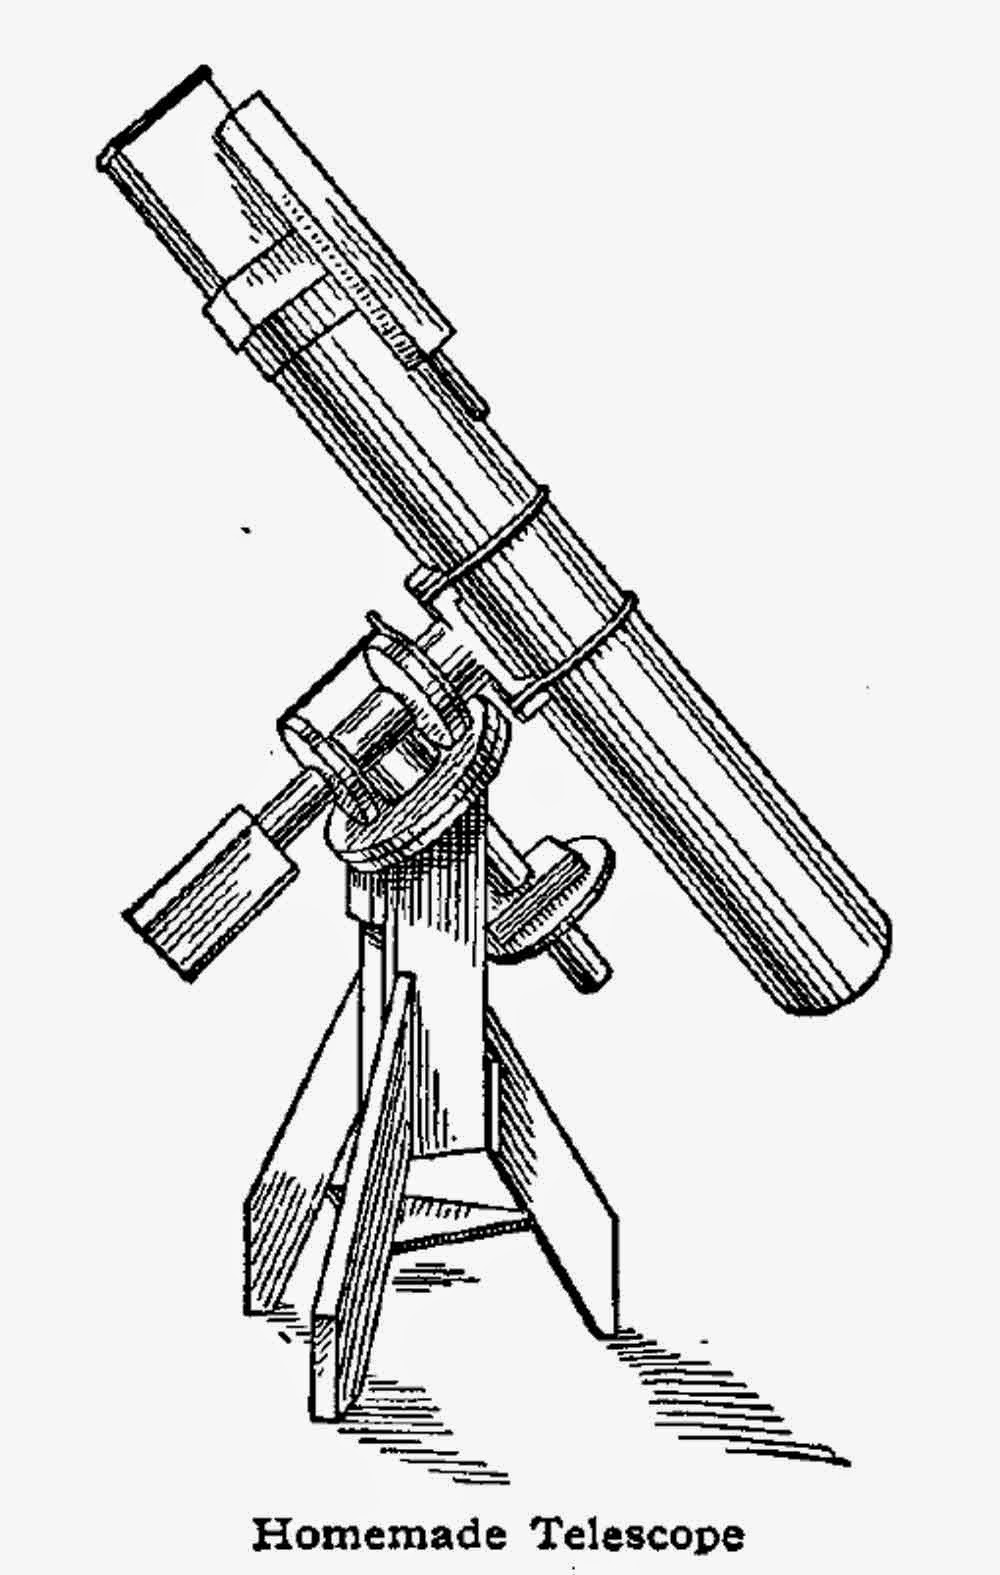
Homemade Telescope
Use wet grain emery for coarse grinding. Take a pinch and spread it evenly on the glass which is on the barrel, then take the glass with the handle and move it back and forth across the lower glass, while walking around the barrel; also rotate the glass, which is necessary to make it grind evenly. The upper glass or speculum always becomes concave, and the under glass or tool convex.
Work with straight strokes 5 or 6 in. in length; after working 5 hours hold the speculum in the sunshine and throw the rays of the sun onto a paper; where the rays come to a point gives the focal length. If the glass is not ground enough to bring the rays to a point within 5 ft., the coarse grinding must be continued, unless a longer focal length is wanted.
Have ready six large dishes, then take 2 lb. flour emery and mix in 12 qt. of water; immediately turn the water into a clean dish and let settle 30 seconds; then turn it into another dish and let settle 2 minutes, then 8 minutes, 30 minutes and 90 minutes, being careful not to turn off the coarser emery which has settled. When dry, turn the emery from the 5 jars into 5 separate bottles, and label. Then take a little of the coarsest powder, wetting it to the consistency of cream, and spread on the glass, work as before (using short straight strokes 1-1/2 or 2 in.) until the holes in the glass left by the grain emery are ground out; next use the finer grades until the pits left by each coarser grade are ground out. When the two last grades are used shorten the strokes to less than 2 in. When done the glass should be semi-transparent, and is ready for polishing.
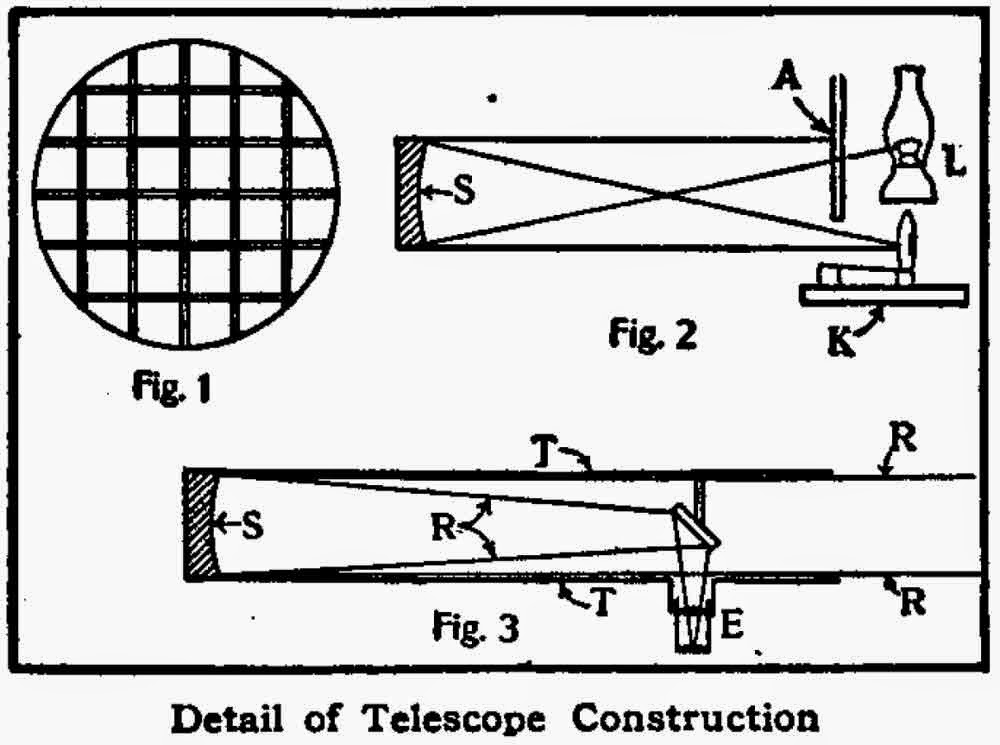
When polishing the speculum, paste a strip of paper 1-1/3 in. wide around the convex glass or tool, melt 1 lb. of pitch and turn on to it and press with the wet speculum. Mold the pitch while hot into squares of 1 in., with 1/4-in. spaces, as in Fig. 1. Then warm and press again with the speculum, being careful to have all the squares touch the speculum, or it will not polish evenly. Trim the paper from the edge with a sharp knife, and paint the squares separately with jewelers rouge, wet till soft like paint. Use a binger to spread it on with. Work the speculum over the tool the same as when grinding, using straight strokes 2 in. or less.
Detail of Telescope Construction
When the glass is polished enough to reflect some light, it should be tested with the knife-edge test. In a dark room, set the speculum against the wall, and a large lamp, L, Fig. 2, twice the focal length away. Place a large sheet of pasteboard, A, Fig. 2, with a small needle hole opposite the blaze, by the side of the lamp, so the light from the blaze will shine onto the glass. Place the speculum S, Fig. 2, so the rays from the needle hole will be thrown to the left side of the lamp (facing the speculum), with the knife mounted in a block of wood and edgeways to the lamp, as in K, Fig. 2. The knife should not be more than 6 in. from the lamp. Now move the knife across the rays from left to right, and look at the speculum with the eye on the right side of the blade. When the focus is found, if the speculum is ground and polished evenly it will darken evenly over the surface as the knife shuts off the light from the needle hole. If not, the speculum will show some dark rings, or hills. If the glass seems to have a deep hollow in the center, shorter strokes should be used in polishing; if a hill in the center, longer strokes. The polishing and testing done, the speculum is ready to be silvered. Two glass or earthenware dishes, large enough to hold the speculum and 2 in. deep, must be procured. With pitch, cement a strip of board 8 in. long to the back of the speculum, and lay the speculum face down in one of the dishes; fill the dish with distilled water, and clean the face of the speculum with nitric acid, until the water will stick to it in an unbroken film.
The recipe for silvering the speculum is:
Solution A:
Distilled water………………………..4 oz.
Silver nitrate……………………….100 gr.
Solution B:
Distilled water………………………..4 oz.
Caustic stick potash (pure by alcohol)….100 gr.
Solution C:
Aqua Ammonia.
Solution D:
Sugar loaf…………………………..840 gr.
Nitric acid…………………………..39 gr.
Alcohol (Pure)………………………..25 gr.
Mix solution D and make up to 25 fluid oz. with distilled water, pour into a bottle and carefully put away in a safe place for future use, as it works better when old:
Now take solution A and set aside in a small bottle one-tenth of it, and pour the rest into the empty dish; add the ammonia solution drop by drop; a dark brown precipitate will form and subside; stop adding ammonia solution as soon as the bath clears. Then add solution B, then ammonia until bath is clear. Now add enough of the solution A, that was set aside, to bring the bath to a warm saffron color without destroying its transparency. Then add 1 oz. of solution D and stir until bath grows dark. Place the speculum, face down, in the bath and leave until the silver rises, then raise the speculum and rinse with distilled water. The small flat mirror may be silvered the same way. When dry, the silver film may be polished with a piece of chamois skin, touched with rouge, the polishing being accomplished by means of a light spiral stroke.
Fig. 3 shows the position of the glasses in the tube, also how the rays R from a star are thrown to the eyepiece E in the side of the tube. Make the tube I of sheet iron, cover with paper and cloth, then paint to make a non-conductor of heat or cold. Make the mounting of good seasoned lumber.
Thus an excellent 6-in. telescope can be made at home, with an outlay of only a few dollars. My telescope is 64 in. long and cost me just $15, but I used all my spare time in one winter in making it. I first began studying the heavens through a spyglass, but an instrument such as I desired would cost $200—more than I could afford.
Then I made the one described, with which I discovered a new comet not before observed by astronomers.
Excerpt from the book:
THE BOY MECHANIC
VOLUME I
700 THINGS FOR BOYS TO DO
WITH 800 ILLUSTRATIONS
1913, BY H. H. WINDSOR CHICAGO
POPULAR MECHANICS CO. PUBLISHERS
Read more »
First, get two pieces of plate glass, 6 in. square and 1 in. thick, and break the corners off to make them round, grinding the rough edges on a grindstone.
Use a barrel to work on, and fasten one glass on the top of it in the center by driving three small nails at the sides to hold it in place. Fasten, with pitch, a round 4-in. block of wood in the center on one side of the other glass to serve as a handle.
Homemade Telescope
Use wet grain emery for coarse grinding. Take a pinch and spread it evenly on the glass which is on the barrel, then take the glass with the handle and move it back and forth across the lower glass, while walking around the barrel; also rotate the glass, which is necessary to make it grind evenly. The upper glass or speculum always becomes concave, and the under glass or tool convex.
Work with straight strokes 5 or 6 in. in length; after working 5 hours hold the speculum in the sunshine and throw the rays of the sun onto a paper; where the rays come to a point gives the focal length. If the glass is not ground enough to bring the rays to a point within 5 ft., the coarse grinding must be continued, unless a longer focal length is wanted.
Have ready six large dishes, then take 2 lb. flour emery and mix in 12 qt. of water; immediately turn the water into a clean dish and let settle 30 seconds; then turn it into another dish and let settle 2 minutes, then 8 minutes, 30 minutes and 90 minutes, being careful not to turn off the coarser emery which has settled. When dry, turn the emery from the 5 jars into 5 separate bottles, and label. Then take a little of the coarsest powder, wetting it to the consistency of cream, and spread on the glass, work as before (using short straight strokes 1-1/2 or 2 in.) until the holes in the glass left by the grain emery are ground out; next use the finer grades until the pits left by each coarser grade are ground out. When the two last grades are used shorten the strokes to less than 2 in. When done the glass should be semi-transparent, and is ready for polishing.
When polishing the speculum, paste a strip of paper 1-1/3 in. wide around the convex glass or tool, melt 1 lb. of pitch and turn on to it and press with the wet speculum. Mold the pitch while hot into squares of 1 in., with 1/4-in. spaces, as in Fig. 1. Then warm and press again with the speculum, being careful to have all the squares touch the speculum, or it will not polish evenly. Trim the paper from the edge with a sharp knife, and paint the squares separately with jewelers rouge, wet till soft like paint. Use a binger to spread it on with. Work the speculum over the tool the same as when grinding, using straight strokes 2 in. or less.
Detail of Telescope Construction
When the glass is polished enough to reflect some light, it should be tested with the knife-edge test. In a dark room, set the speculum against the wall, and a large lamp, L, Fig. 2, twice the focal length away. Place a large sheet of pasteboard, A, Fig. 2, with a small needle hole opposite the blaze, by the side of the lamp, so the light from the blaze will shine onto the glass. Place the speculum S, Fig. 2, so the rays from the needle hole will be thrown to the left side of the lamp (facing the speculum), with the knife mounted in a block of wood and edgeways to the lamp, as in K, Fig. 2. The knife should not be more than 6 in. from the lamp. Now move the knife across the rays from left to right, and look at the speculum with the eye on the right side of the blade. When the focus is found, if the speculum is ground and polished evenly it will darken evenly over the surface as the knife shuts off the light from the needle hole. If not, the speculum will show some dark rings, or hills. If the glass seems to have a deep hollow in the center, shorter strokes should be used in polishing; if a hill in the center, longer strokes. The polishing and testing done, the speculum is ready to be silvered. Two glass or earthenware dishes, large enough to hold the speculum and 2 in. deep, must be procured. With pitch, cement a strip of board 8 in. long to the back of the speculum, and lay the speculum face down in one of the dishes; fill the dish with distilled water, and clean the face of the speculum with nitric acid, until the water will stick to it in an unbroken film.
The recipe for silvering the speculum is:
Solution A:
Distilled water………………………..4 oz.
Silver nitrate……………………….100 gr.
Solution B:
Distilled water………………………..4 oz.
Caustic stick potash (pure by alcohol)….100 gr.
Solution C:
Aqua Ammonia.
Solution D:
Sugar loaf…………………………..840 gr.
Nitric acid…………………………..39 gr.
Alcohol (Pure)………………………..25 gr.
Mix solution D and make up to 25 fluid oz. with distilled water, pour into a bottle and carefully put away in a safe place for future use, as it works better when old:
Now take solution A and set aside in a small bottle one-tenth of it, and pour the rest into the empty dish; add the ammonia solution drop by drop; a dark brown precipitate will form and subside; stop adding ammonia solution as soon as the bath clears. Then add solution B, then ammonia until bath is clear. Now add enough of the solution A, that was set aside, to bring the bath to a warm saffron color without destroying its transparency. Then add 1 oz. of solution D and stir until bath grows dark. Place the speculum, face down, in the bath and leave until the silver rises, then raise the speculum and rinse with distilled water. The small flat mirror may be silvered the same way. When dry, the silver film may be polished with a piece of chamois skin, touched with rouge, the polishing being accomplished by means of a light spiral stroke.
Fig. 3 shows the position of the glasses in the tube, also how the rays R from a star are thrown to the eyepiece E in the side of the tube. Make the tube I of sheet iron, cover with paper and cloth, then paint to make a non-conductor of heat or cold. Make the mounting of good seasoned lumber.
Thus an excellent 6-in. telescope can be made at home, with an outlay of only a few dollars. My telescope is 64 in. long and cost me just $15, but I used all my spare time in one winter in making it. I first began studying the heavens through a spyglass, but an instrument such as I desired would cost $200—more than I could afford.
Then I made the one described, with which I discovered a new comet not before observed by astronomers.
Excerpt from the book:
THE BOY MECHANIC
VOLUME I
700 THINGS FOR BOYS TO DO
WITH 800 ILLUSTRATIONS
1913, BY H. H. WINDSOR CHICAGO
POPULAR MECHANICS CO. PUBLISHERS
How to Make a Whirligig Buzz saw Whirligig
A Buzz-saw Whirligig is an interesting toy (Fig. 108). Lay out a disk about 5 inches in diameter upon a piece of cardboard, locate the position for the spool-end on the center of each face, and make four rings outside of this.
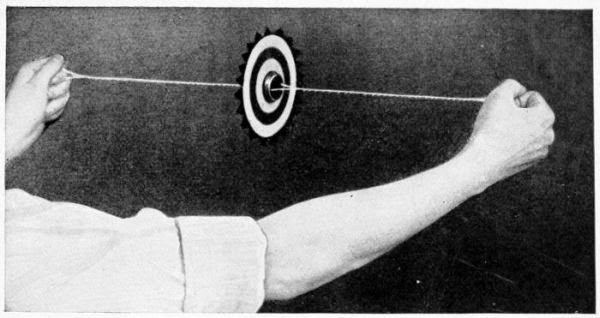
Fig. 108.—The Buzz-saw whizzes when you twist the Cord.
Divide the circumference of the disk into sixteen equal parts, and lay off the teeth as shown. (Fig. 111.)
The spool-ends used for centers should have two holes drilled through them for the twisting cord to slip through, and should be fastened to the disk with glue or brads.
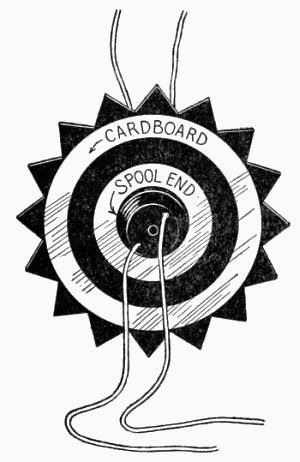
Fig. 111.—Detail of Buzz-saw Whirligig shown in Fig. 108.
A cotton string is best for
Operating the Whirligig. After slipping it through the holes in the spool-ends, tie the ends together. To work the toy, slip the first finger of each hand through the loop of each end, and whirl the disk in one direction until the string is twisted from both ends as far as the center.
Then pull firmly on the ends of the string, and the disk will whirl in the opposite direction until the string is untwisted and twisted up again in the opposite direction.
As the strings twist, slacken your hold upon the ends, and when it has wound up tight pull again to make it whirl in the opposite direction. The disk should whirl very steadily when working right, and the knack of making the string twist so the disk will do so is attained with a little practice.
HOME-MADE TOYS FOR GIRLS AND BOYS
BOOKS BY A. NEELY HALL
LOTHROP, LEE & SHEPARD CO., BOSTON
Published, August, 1915
Read more »
Fig. 108.—The Buzz-saw whizzes when you twist the Cord.
Divide the circumference of the disk into sixteen equal parts, and lay off the teeth as shown. (Fig. 111.)
The spool-ends used for centers should have two holes drilled through them for the twisting cord to slip through, and should be fastened to the disk with glue or brads.
Fig. 111.—Detail of Buzz-saw Whirligig shown in Fig. 108.
A cotton string is best for
Operating the Whirligig. After slipping it through the holes in the spool-ends, tie the ends together. To work the toy, slip the first finger of each hand through the loop of each end, and whirl the disk in one direction until the string is twisted from both ends as far as the center.
Then pull firmly on the ends of the string, and the disk will whirl in the opposite direction until the string is untwisted and twisted up again in the opposite direction.
As the strings twist, slacken your hold upon the ends, and when it has wound up tight pull again to make it whirl in the opposite direction. The disk should whirl very steadily when working right, and the knack of making the string twist so the disk will do so is attained with a little practice.
HOME-MADE TOYS FOR GIRLS AND BOYS
BOOKS BY A. NEELY HALL
LOTHROP, LEE & SHEPARD CO., BOSTON
Published, August, 1915
HOW DOES TIDAL POWER WORK
Have you ever watched the sea during a storm?
The waves crash down with enormous energy. Sometimes they are strong enough to damage seaside walls and buildings, or even make cliffs crumble.
Do you know how we can make use of energy from the waves?
One idea is to place a line of rafts floating on the sea. These rafts move up and down with the waves, and their kinetic energy can be converted to electricity. One type of raft is the Salter duck, named after its British inventor, Stephen Salter. Salter ducks bob up and down as the waves pass by. Their movement produces energy that pumps water through a turbine, which then turns a generator.
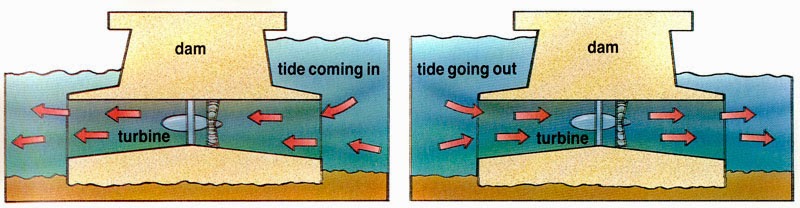
As the tide water flows out, it passes through turbines to generate electricity. There are few large tidal power stations because they are expensive to build.
The energy in the sea’s tides, which rise and fall every day, can be converted to hydroelectric power. When the tide comes in, the water is stored behind a dam. When the tide goes out, the water flows from the dam through a turbine and produces electricity. There are tidal power stations in northern France, on the Annapolis River in the Canadian province of Nova Scotia, and at Murmansk in Russia.
Read more »
The waves crash down with enormous energy. Sometimes they are strong enough to damage seaside walls and buildings, or even make cliffs crumble.
Do you know how we can make use of energy from the waves?
One idea is to place a line of rafts floating on the sea. These rafts move up and down with the waves, and their kinetic energy can be converted to electricity. One type of raft is the Salter duck, named after its British inventor, Stephen Salter. Salter ducks bob up and down as the waves pass by. Their movement produces energy that pumps water through a turbine, which then turns a generator.
As the tide water flows out, it passes through turbines to generate electricity. There are few large tidal power stations because they are expensive to build.
The energy in the sea’s tides, which rise and fall every day, can be converted to hydroelectric power. When the tide comes in, the water is stored behind a dam. When the tide goes out, the water flows from the dam through a turbine and produces electricity. There are tidal power stations in northern France, on the Annapolis River in the Canadian province of Nova Scotia, and at Murmansk in Russia.
Sunday, March 8, 2015
How to Increase Weight Naturally
.jpg)
Some people are able to get the weight down, and there are many who want to gain weight. Do not be surprised, because thats a fact. Perhaps you are reading this article one of them. As a result of thin body is equally the danger of body fat (obesity), most people experience problems like skinny excessive fatigue, difficulty concentrating, ataupu malnutrition.
Adding weight also for some people is not the easy thing, just like when people want to lose weight is very hard for mercy. Since one of the causes are caused by factors genitik, the persons weight is also influenced by genetic factors (inherited from parents). For the person may be difficult to add weight.
But do not be pessimistic first, for those of you who feel your body less features (thin) because this time we will discuss how to gain weight naturally. Well, consider carefully the following article:
Add Calories
Excess calories is one thing that causes people overweight. Well, for those of you who want to gain weight, eat food banya calories such as white rice, foods with ingredients wheat, meat, and many others. The thing to remember, you also have to stay on top of the food 5 4 perfectly healthy.
Eat Food Items
When youre intending to gain weight, do not think to consume as much food as possible that can not even raise your weight. But choose foods that contain a lot of nutrients, such as milk, nuts, avocados, and many others.
Do not Drink Before Eating
It may be trivial but it has far reaching consequences for those who want to gain weight, drink water before eating will make you feel full. Especially if you consume sugary beverages like milk and coffee, because the sugary food or drink that you will make your stomach feel full. Even if you want to drink coffee or milk, should be done after a meal.
Snacking the Right
Snacking also gives big impact for those who want to gain weight, consume foods that contain lots of protein but not too much fat such as nuts, snacks with dairy ingredients, as this will also make your body more powerful. Remember, avoid snacking by eating instant noodles, because in fact it is very dangerous to your health if consumed continuously.
Eating Before Sleep
Eat one more time before you sleep, try to eat well which contains nutrients. But, do not eat too much of that actually makes your stomach fullness so you can not sleep.
Sport
Some people even consider exercising to lose weight, its true that exercise burns the most calories too much. Well, for those of you who want to gain weight exercise such as lifting bebab select, push ups, anaerobic exercise such as muscle mass will increase so that the body becomes more dense and contain. You definitely do not want it, if after you weigh up your body actually looks bloated or sebagainnya, and is also useful for women to tighten the skin when your body weight increases.
Sleep is Enough
Maybe youve heard the words of the old "do not stay up all night, or youll be skinny and sick", perkataaan is indeed true. It has also been proved that most people who stay up all night would be skinny.
Stop Smoking
Most people who smoke have a skinny tubh, is caused by substances in cigarettes suppress your appetite. But that does not mean if you are skinny and want to smoke because smoking is very, very bad for the health.
Attach Target
It is important, even very important to do, because you will be trying to set targets consistently to gain weight. Keep a record of your weight loss progress every week, and specify the target to which. Well, for those of you who can not define these targets, admins also have an article How to Calculate Ideal Body Weight please click here. But remember, do not use instant way because usually instant way will not last long.
So I add weight naturally, hopefully you can reach the target soon. Do not forget to click like and share
Subscribe to:
Posts (Atom)